Showing posts with label crochet. Show all posts

Sunday, October 12, 2014

Crochet Queen Anne Lace Shawl

Echt ... ik heb wel 6 proeflapjes gemaakt. En weer allemaal uitgehaald. Ik geef het op ! Ik kan gewoon écht niet breien. Ja ... gewoon recht toe recht aan, dát lukt nog wel. Maar als er moet worden gemeerderd of geminderd pfffff. Een ramp ! :P Bijna 60 en ik heb wel mijn eigen "cloud" gemaakt, maar breien blijft bij mij broddelen en zweten.
Daarom ben ik toch maar begonnen om de shawl, waaraan ik de Queen Anne Lace zou maken, te gaan haken.

Eerst heb ik het patroon van de Queen Anne Lace Scarf gevolgd. Het diagram vindt je verderop in deze post.
Daarna ben ik begonnen met 3 stokjes op te zetten. Elke toer heb ik aan één kant op het eind 1 steek gemeerderd. En elke 3 toeren zette ik een bloemblad vast met een halve vaste. 
Op ongeveer een meter heb ik over 12 toeren niet gemeerderd, noch geminderd. Daar valt precies 1 bloem in. O ja, per bloem zet ik drie bloemblaadjes vast.
Na die 12 toeren, ben ik gaan minderen. Ook weer 1 steek per toer. Net zolang tot ik drie stokjes over hield.

Het garen is Stylecraft Special DK, kleur: Teal - 350 gram - haaknaald 4,5mm.
Deze kleur vind ik echt chique-de-friemel. In mijn jonge jaren heb ik een periode gehad, waarin ik mijn kleding in die kleur droeg. Inclusief schoenen, riem, oorbellen, handtas, zonnebril ... de hele reut. En nu nog steeds is het mijn favoriete kleur. 

.............................................

Really ... I made about six swatches. And frogged them all. I give up ! I just can't knit. 
The only thing I can get accomplished is just straight forward. But when it comes down to increase or decrease ... pfff ... I'm a disaster ! Amost 60 and managed to create my very own "cloud", but my knitting stays shoddy work with a lot of sweat. 
So that's why I started to crochet the main body of this shawl after all ...

I started with the "Queen Anne's Lace Scarf" -diagram (you can see it below).
The part of the shawl, I started with 3 DC. Every row I increased one DC at one end of row.
Every 3 rows I attatched one petal with a slip stitch to the main shawl.
At a lenght of about 39.4"  I made no increases nor decreases over 12 rows.
Before I forget : I attatched three petals per flower.
After those 12 rows straight, I started to decrease in the same sequence as the first part.
Untill I ended up with 3 DC.

I used Stylecraft Special DK, color Teal - about 12.5Oz - hooksize 4,5mm
I just adore this color. In my youth I wore just this color over a period a several years. 
Including shoes, belt, earrings, handbag, sunglasses ... the lot.  And still it's my favorite color.


'k Hoop dat je m'n shawl mooi vind en nog eens vaker langs komt op mijn blog. Hou je haaks :)

I hope you like my shawl, and don't be a stranger ... I'll keep you in the loop ;)


Thursday, February 21, 2013

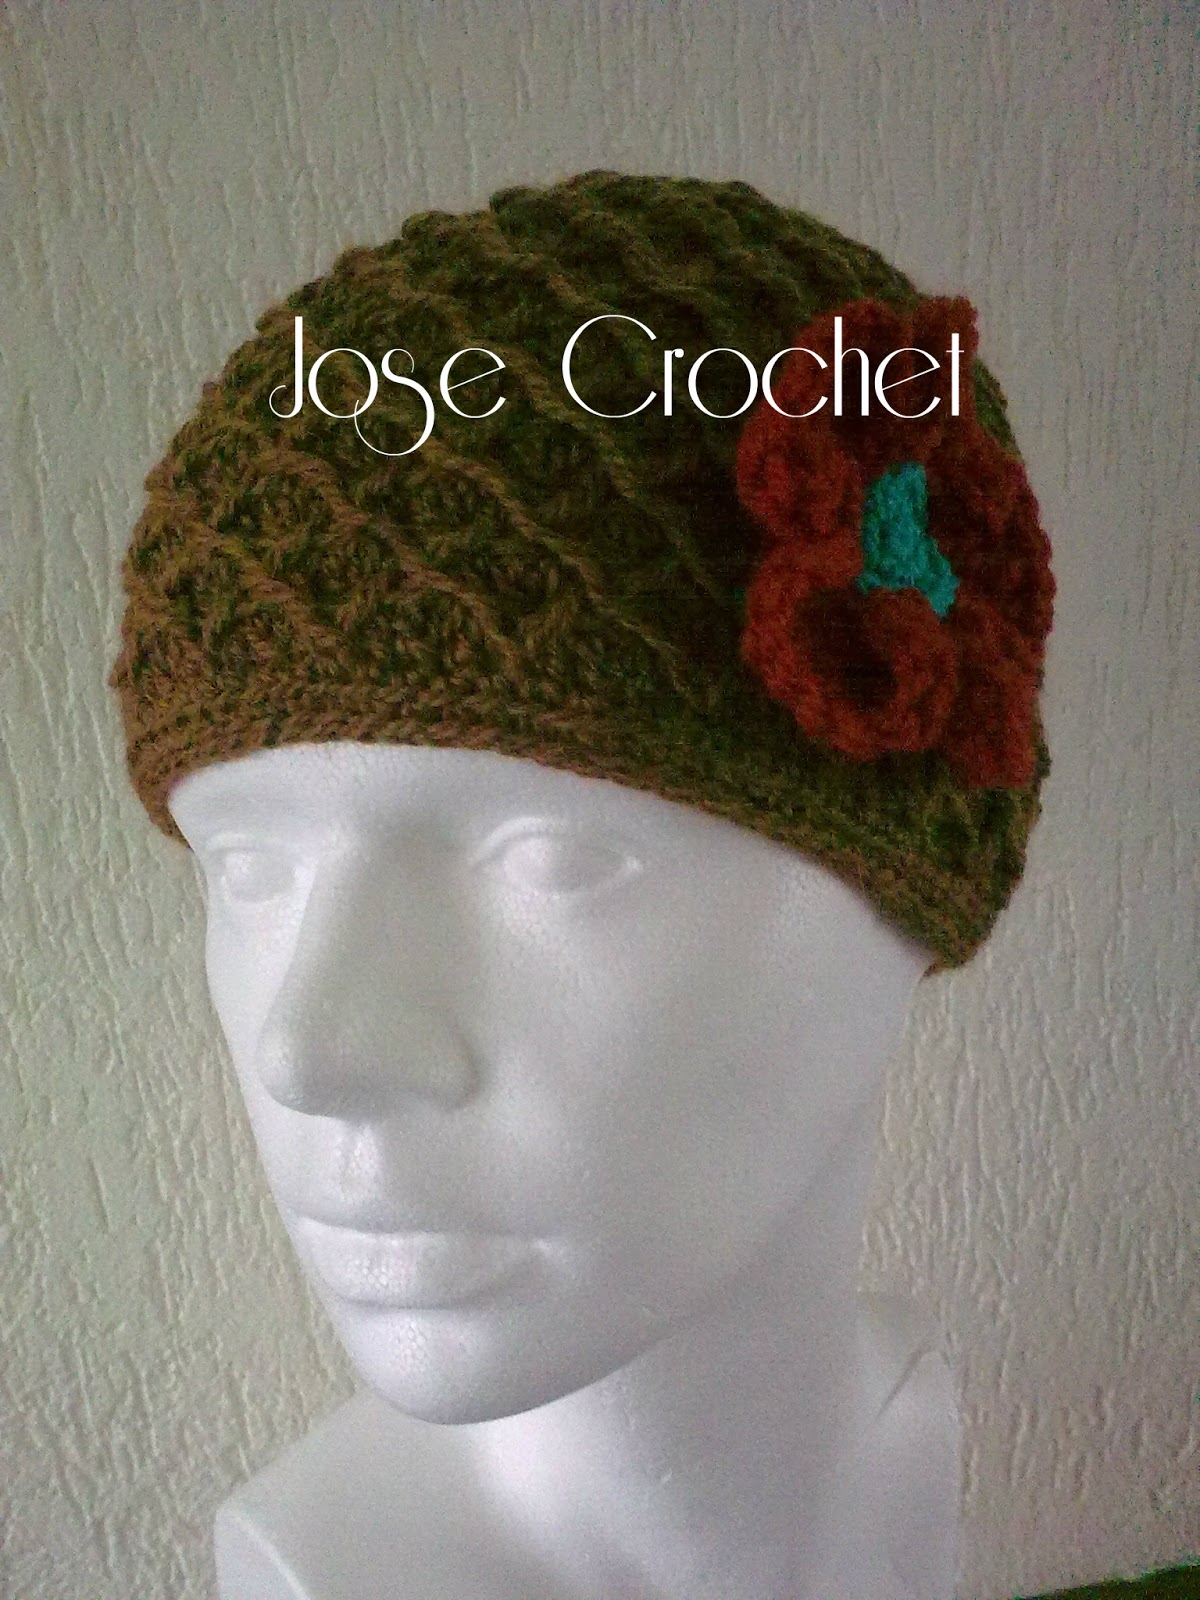
The Diamond Ridges Hat + tut --- Diamant Muts

I've made this hat already so many times, that I've  lost count. 
As you will see, the original pattern calls for a small,  ribbed brim. 
But pigheaded, as I am, I like a real, wide brim. I keep thinking that's  more feminine.

Now I'll show you some pictures of this hat, in different colors and with different decorations.

But first I will have to apologize for my blog-name in big on every picture. I hate it, but due to the fact that there are copycats, that don't link back. So, I'll just have to. Sorry, dear readers  :( 
Note: scroll down for tutorial

Deze muts/hoed heb ik al zó vaak gehaakt, dat ik de tel ben kwijt geraakt.
Zoals je kunt zien, geeft het patroon een korte, geribde rand aan.
Maar ik ben eigenwijs, ik hou van een échte rand. Ik blijf dat veel vrouwelijker vinden. 

Hierna zal ik je wat foto's van deze muts laten zien, in verschillende kleuren en met verschillende decoraties. 

Maar eerst wil ik mijn excuses aanbieden voor mijn blog-naam over alle foto's. Ik vind het foeilelijk, maar het moet wel vanwege het feit dat er copycats zijn, die niet terug linken. Dus dit moet gewoonweg. Sorry, lieve lezers :(
Noot: scroll naar beneden voor tutorial


Well, let's start with the one I really knocked myself out with. Complete with a black flower (with beads !!)  and red feathers on both sides. I nicked those feathers from an old boa. 


Laten we beginnen met de muts waarmee ik helemaal uit m'n dak ben gegaan. Kompleet met een zwarte bloem (met kraaltjes!) en rode veren aan beide kanten. Die heb ik van een oude boa gepikt.


If  I'm not mistaken, this was the first one I made. I did no decorations on this one. But I wanted to show it to you, because you can see the diamond ridges so well. I crocheted it with a baby-soft yarn.

Als ik me niet vergis, was dit de eerste die ik maakte. Hier heb ik geen decoraties op gemaakt, maar wilde het je laten zien vanwege het goede zicht op het patroon van de muts.
Ik haakte deze met een baby zachte wol. (Zeeman Babysoft)


This one doesn't fit any of my model heads, because it's too small for that. It's really meant as a sweet little hat for a sweet little girl. With the puff-stitch flowers. a.k.a. Mollie Flowers (with tutorial).
 
Deze past op geen van de twee model-hoofden die ik heb. Daar is het te klein voor. Het is dan ook een lief, klein hoedje, bedoeld voor een lief, klein meisje.
Met een Mollie Flowers decoratie. 
(daar vind je een foto tutorial, dus ook makkelijk te maken voor niet-Engels-lezenden) 


With a different color yarn and flowers, it looks like it's a completely different hat. So, you can make this hat to anyones liking.

Met andere wol en andere bloemen, wordt het weer een totaal andere muts. Deze muts kan je dus naar ieders wens maken.


This is how it looks like with a very short brim. Without the flower it even suits a man.

Zo ziet het er uit met een hele korte rand. En zonder de bloem, zal het een man zeker ook staan.


This one I made in combination with a contrasting yarn in the brim area. Gives it a great look I think. 
The scarf I crocheted in a slanted stitch variation. Because it's the same yarn as the hat, it goes well together. 
Really anything will look good on this girl, BTW  ;)


Deze heb ik gemaakt in combinatie met een contrasterende wol in de rand. Persoonlijk vind ik dit een erg mooi effect geven.
De sjawl heb ik in een variatie van een gekantelde steek gemaakt. Omdat het met hetzelfde garen is gemaakt, past het goed bij elkaar.
Maar deze meid staat werkelijk àlles baaidewee ;)


The (free) Ravelry download pattern can be found HERE
The pattern gives only one size, so you'll have to experiment with yarn and hooksize, to obtain a different gauge.
I used a yarn, suited for hook G 4mm and worked the hat with a 4,5mm hook. This will fit an adult female.
If you don't have a Ravelry-account, or you don't want one, you can always email me to send it to you.

Het (gratis) Ravelry PDF patroon vindt je HIER 
Als je nog geen (gratis) Ravelry-account hebt ..... meteen aanmaken. Er staat heel veel op. En de zoekfunctie is erg makkelijk.
Het is een Engels patroon. 
Het patroon is in één maat gemaakt, dus om de muts groter of kleiner te maken, moet je met de wol en de haakmaat experimenteren.
Ik heb wol gebruikt dat geschikt is voor haak 4mm, maar gebruikte een 4,5mm haak. Dit past een volwassene.
Onder andere de Baby-soft van de Zeeman en de Bianca van de Wibra zijn een goed voorbeeld.
Mocht je geen Ravelry-account hebben, of er geen willen aanmaken, dan kan je me altijd mailen, zodat ik het je toestuur. 
Onderstaande tutorial is alleen in het Engels, omdat het patroon in het Engels is.


~~~~~~~~~~~~~~~~~~~~~~~~~~~~~~~~~~~~~~~~~~~~~~~~


Tutorial clusters in rows  5 - 6 - 7:

I noticed some have difficulties crocheting the clusters in this hat, so upward of row 4 I made a photo-tutorial, how to do the clusters.
When you click on the pictures they'll be enlarged.
Ofcourse you don't, but for this tutorial I began every row in a contrasting color, so it's easier for you to see.


This is how your work looks after you've finished row 4


Wednesday, July 25, 2012

W.I.P. tasje ~ purse

Het hals sieraad dat ik pas maakte, was eigenlijk een testje voor mijn volgende project. Binnenkort is de bruiloft van mijn dochter en voor deze gelegenheid had ik nog geen handtasje. Het moet iets worden dat niet te groot is; je moet er per slot van rekening de hele dag mee rondlopen. Mannen hebben het wat dat betreft maar makkelijk: die stoppen alles in hun zakken.
Veel meer dan genoeg zakdoekjes hoeft er niet in. Manlief laat ik met alle liefde de sleutelbos beheren.
Gisteren brachten mijn schoonzus en zwager een heel mooi boeketje mee in een schattig (parfum- ?)  flesje. Op de foto beide items.
Vanaf hier moet ik met de voering gaan beginnen. Die wordt in dezelfde stof als mijn kleding. De rok was nl. lang en die heb ik tot knielengte vermaakt.
Ik heb voor het tasje geen patroon gebruikt. Gewoon uit de losse hand ......

The necklace I made recently, was in fact a sort of try out for my next project.  
My daughter's  wedding will be soon and for this occasion  I did not have a handbag yet. It had to be something not too big; you have to carry it along all day. Men have it easy: they put everything in their pockets. The purse doesn't have to contain much more than enough tissues. I'll leave the keys to my hubby. 
Yesterday my brother- and sister in law, gave us such a lovely bouquet in a chique little (perfume- ?) bottle. You see both items on the picture.
From this point I'll have to start on the lining. It will be in the same fabric as my clothes. The skirt was too long, so I made it knee-high.
I didn't have a pattern for the purse. Just made it along the way.

   LOL .... als je goed kijkt, zie je mij in alle kraaltjes :D
   LOL .... if you take a good look, you can see me in all of the beads :D

ik denk dat ik er nog een polsbandje aan maak, nog niet zeker ......
I consider to attatch a wristband, not sure yet .....

mooi he ?  ~ beautifull


Hou je haaks !   
I'll keep you in the loop !


You are welcome to leave me some comment.

Tuesday, March 13, 2012

Veel gedaan ~ Done a lot

Zo nu en dan heb je zelf niet in de hand waar je mee bezig bent. Moet je ineens van alles, wat je niet had gepland. Soms zijn dat gelukkig ook hele leuke dingen. Van haken word ik blij en rustig, en aangezien ik dat veel gedaan heb de laatste week, is het nu dan ook even tijd voor niet-haken !  maar mijn blog bijwerken.
Ik wilde onlangs eerst weer eens een babymutsje maken, maar dan nu in een hele andere kleur en met een dubbele kleur vlecht, zodat ik de bloem ook in die twee kleuren kon maken. Het is de grote bloem die ik eerder heb beschreven, maar dan zonder de laatste toer.
Het (Engelse) patroon heb ik gekocht van Bonita Patterns. De ontwerpster, Lianka Azulay werkt hoofdzakelijk met een schubbenstructuur, ofwel: Crocodile Scale Stitch. Dit mutsje heet: Crocodile Stitch Earflap Hat. Zij maakt duidelijk geschreven en goed te volgen patronen. Een aanrader dus. Behalve dit patroon heb ik haar complete E-book met patronen, waarvan ik er al meerdere heb gehaakt (PDF via de mail - héél handig).
Ik heb al diverse babymutsjes gemaakt. Veel werk, maar met een fantastisch resultaat.
Ben nog geen oma, maar heb toch wel een babypop nodig om die mutsjes op te zetten. Tot ik er eentje heb een kandelaar eronder ... dan maar. Alle mutsjes zijn gehaakt met een heerlijk zachte babywol.
                                                           

Sometimes you're not in control of your pursuits. Suddenly you have to do things you didn't plan to do. Gladly, sometimes those things are lovely to do. Crochet makes me happy and quiet and since I've been doing that a lot in the past week, it's now time to work on my blog.
I had this idea to make a two toned babyhat. In particular the Crocodile Stitch Earflap Hat, designed by Lianka Azulay. Her shop: Bonita Patterns you can find here.
Lianka works mainly with the crocodile scale stitch, and so this bayhat is called: Crocodile Stitch Earflap Hat. She makes explicit patterns, to recommend to you. 
I bought her entire E-book, of wich I made several items already. I wanted to show you the earflap hats I made so far. It's a lot of work, but really worth the effort !
Since I don't have a grandchild as yet and no baby doll, I have to show you the hats on a candlestick.  All hats are made with a lovely soft baby yarn.


Deze laatste is het resultaat van de gecombineerde kleuren.

This last one is the result with the two tones.


Hou je haaks !

I'll keep you in the loop !


You are welcome to leave me some comment.

Sunday, February 19, 2012

Eindelijk klaar ~ Finally done

Het resultaat van nog even flink doorzetten.

This is the result after carrying on hard. 

Ik weet echt niet meer waar ik het patroon van de square vandaan heb, maar ik wil het graag met jullie delen.

Really don't remember where I got the square-pattern, but I'd like to share it with you.
Ik heb dit patroon nog niet vertaald. Mocht je graag een vertaling hebben, laat me het dan even weten, dan doe ik dat alsnog.


Hou je haaks !

I'll keep you in the loop !


You are welcome to leave me some comment.

Friday, February 17, 2012

W.I.P. (work in progress) Granny Squares

Vandaag kon ik er niet meer tegen. Elke keer als ik die ene la open trok, zag ik dat onafgemaakte werk liggen. Een WIP dus. Die zullen hier wel meer langskomen, ben ik bang. Vorig jaar hingen de winkels vol met vesten, truien en poncho's gehaakt van Granny Squares, gekleurde vierkantjes. Ik dacht natuurlijk meteen: dat kan ik zelf ook wel. Maar je vergist je in de hoeveelheid werk dat het met zich meebrengt. Zóveel draadjes af te hechten !! En dan moeten ze nog aan elkaar. Halverwege dat proces is het in die la beland en staarde me telkens weer aan. Ken je dat, dat je dan een hekel aan jezelf gaat krijgen ? Het blijft je dwars zitten. Dus nu de koe bij de hoorns gevat en wat ik al aan elkaar had, weer uitgehaald en besloten dat ik er een kussenhoes van maak. De eerste kant heb ik al bijna af. Als je wilt weten hoe ik ze aan elkaar haak, klik dan hier

Today I could not stand it anymore. Every time I opened that drawer, I saw that unfinished item. A WIP. Those will come around here more, I'm afraid.
Last year all the shops here were stacked with vests, sweaters and poncho's, made from Granny Squares. And stupid, ambitious me thought I could make those myself. But I didn't calculate the enormous amount of work it wiould take. So many loose ends to fasten off ! And putting them together as well. Half done with it, this work ended up in a drawer and was staring at me ever since. Do you know that feeling, that you're going to dislike yourself ? That it's keeping bothering you ? So I grabbed the bull by the horns, ripped apart what I allready assembled and decided I'm going to make a pillowcover out of it. I almost finished one side. If you want to know how I crochet them together, click here


Hou je haaks !

I'll keep you in the loop !


You are welcome to leave me some comment. 
 

Thursday, February 16, 2012

Viking helm ~Viking helmet

De afgelopen 2 jaar heb ik redelijk wat verschillende dingen gehaakt. Je wilt per slot van rekening ervaren wat je het leukst vindt om te maken. En in die beginfase heb ik heel veel pannenlappen en onderzetters gemaakt. Daar ben ik nu echt klaar mee. 
In die periode zocht ik van alles op internet, want haaktijdschriften bestaan er niet zo veel. Bovendien staan er in verhouding veel breipatronen in en ik ben echt een dummy met breien. Recht toe, recht aan dat gaat nog wel, maar o wee als ik een steek laat vallen. Paniek ! Dus blijf ik lekker haken.

The past two years I've made several different items, to experience what I like most to crochet. For starters I made loads of potholders and coasters, but Im done with those.
In my learningfase I searched all over the internet for nice patterns, because there aren't that many crochetmagazines (in the Netherlands) and besides when you find one it's stacked with knittingpatterns as well. But I'm a dummy when it comes to knitting. Straight forward ... oké, that I can manage, but I'm in panic when a stitch is dropped ! So I stick to crochet.

Ongeveer een jaar geleden ontdekte ik de site: etsy.com , waar je echt van alles op kan vinden, ook patronen. Dit alles wel te koop natuurlijk. Daar vond ik het patroon van een schitterende vikinghelm met hoorns. Die móest ik maken. De ontwerpster is Tara en hier is de link naar haar blog. 

About a year ago I discovered etsy.com where you can find anything you want, also patterns. All for sale of course. On etsy I found an adorable pattern of a vkinghelmet that I really hád to make. The designer is Tara and here  is the link to her blog.

Het Engelstalige patroon is heel duidelijk en goed te volgen.

The English pattern is is quite clear described. Easy to follow.
Ik heb daarna meer patronen bij haar gekocht, maar daar kom ik later op terug.

I bought more patterns from Tara, but will post about those later.     


Hou je haaks !

I'll keep you in the loop !


You are welcome to leave me some comment.

Tuesday, February 14, 2012

Nieuw schrift - New exercise book

Mijn eerste post op mijn blog, voelt aan als dat je een nieuw, leeg schrift dat je voor je hebt. Ik moet er dan ook nog even aan wennen.

Behalve hier te posten wat ik zoal gemaakt hebt, of wat er op mijn haak zit, lijkt het me zinvol om voor de beginnende haakster/haker (jaja, er zijn diverse mannen die haken) te vermelden waar ik mijn kennis en/of patronen vandaan heb. 

Om te beginnen een patroon wat ik zelf recent heb uitgevogeld. Ik had een poosje geleden een enorm originele möbius- of moebius-muts gevonden, maar de haakster verkoopt haar patronen (nog) niet. Het bleef me dus intrigeren hoe ze die maakt. Ze heet Lenore Berry-Zaragosa. Haar shop heet : Strawberrycouture en de link naar haar blog is  hier .

Deze muts is dus niet een simpel recht eind haken en dan een slag gedraaid aan elkaar naaien. Voor deze muts heb je een dikke, soepele wol nodig, voor haak nr 5 of 5,5.  Ik ben begonnen met een ketting van ongeveer 75 lossen. Deze sloot ik met een halve vaste. De eerste toer leek me het best te beginnen met vasten. Zodra je rond bent, niet de toer sluiten, maar een slag draaien en aan de onderkant van de vasten die je al gehaakt hebt, doorgaan met vasten. (O jee, ik hoop dat ik het een beetje begrijpelijk uit kan leggen) Je komt dan vanzelf weer uit waar je begonnen bent, maar dan heb je wel een 8 gehaakt en niet een O. 
De toeren daarna wissel je naar eigen fantasie af met reliëfstokjes voor en achter.
                                                       ******
My first post on my brandnew blog feels like a new, empty exercise book. I will have to get used to it I guess. 

Exept posting what I've made  -or what's on my hook-  I'll post the source of the patterns I used if possible.

For starters a pattern I had to figure out myself, because the woman that makes them, does not sell her patterns (as yet). Her name is Lenore Berry-Zaragosa. Her shopname is: Strawberrycouture and you can find her blog here.
This hat is'nt a simple straight forward crocheted item and sewed together after made a twist. It took me a while to find out what a möbiusring was. Call me blond !! I used wool suited for hook 5 or 5,5 mm. and started with a chain approx. of 75. Close with a slip stitch. First row I did single crochet. At hte end of the row: don't close it, but twist the beginning once and continue to sc on the bottom of the sc's of first row. (oh my God, I do hope I explaned this clear). At the end of this row you finish where you've started, but you've crocheted in fact an 8 instead of a O. Use your own fantasy on the following rows. I alternated rows of front post DC and back post DC.


Ik ben nog niet tevreden met de malle punt, die ik er later aangehaakt heb. Op die manier is de muts wel gesloten en blijft die in vorm.


I'm not satisfied with that silly pointed thing on top. I closed the hat with it afterwards. In that way the hat stays in shape.


Dit is nr 2, maar ik heb de draadjes nog niet afgewerkt. Eerst maar eens bekijken of ik er tevreden over ben en hoe ik de muts van boven sluit.

This is number 2, not cast off yet, because I only do so when I'm satisfied and know how to close the top of this one.


  Ik weet niet of het goed te zien is, maar de muts is afgewerkt met een randje pom-pom garen. 

I don't know if it shows, but the last row I did with pom-pom-yarn.


En omdat deze muts van boven nog open is, kun je die nu nog in allerlei vormen opzetten, er zelfs een nekwarmer van maken.  

Because this hat is still open, you can shape it in any form you like, even make a neckwarmer or cowl out of it.


Het slagen van een muts of hoed hangt meestal samen met de keuze van de wol en de woldikte. Ik denk dat ik de ideale wol voor deze muts nog niet gevonden heb. Maar ik ben dan ook niet snel tevreden over wat ik gemaakt heb.

If your hat will become a success mainly depends on the yarn you use. I don't think I found the right yarn yet, but then again, I'm not easy satisfied by what I've made.


Hou je haaks !

I'll keep you in the loop !


You are welcome to leave me some comment.